Access Denied
IMPORTANT! If you’re a store owner, please make sure you have Customer accounts enabled in your Store Admin, as you have customer based locks set up with EasyLockdown app. Enable Customer Accounts
About TempleFlakes
The Creator
This project was created by Aaron Barker from Springville, Utah. He was looking to recreate some Star Wars snowflakes he saw in 2016, and at some point in the process the idea of duplicating the spires of the temples as the arms of the temples came to mind. He dropped the initial Star Wars idea and decided to give the temple version a try instead. He tried various tools to mirror the one arm 6 times and after many hours, figured it out. With an easy way to render the snowflakes, TempleFlakes were born!The Process
Getting a temple into a TempleFlake is a tricky process. First I have to find a good photo to start from. Most the time I have some good ones from my own collection of LDS Temple photos, but sometimes not. Sometimes it is a good photograph, but the angle is wrong (needs to be straight on), or too low.Then I have to resize it into my template to see what parts of it will look the best. The spire can’t be too small, but want to get some of the potentially iconic designs of windows, arches, etc. Zoom in and out to find the right mix.
Next comes outlining the temple, which isn’t too hard. The hardest part is determining which elements of the temple are the right ones to use, and then figure out how to use them.
The TempleFlakes have the equivalent of two colors: plastic (black) and hole (white). So how do you show the nuances of a window/arch/feature with just two colors? When there are multiple levels of things (a tower, with a railing and a window) which do you make hole and which is plastic? That is where it gets tricky.
Add to this that this is for something that will be printed in around a 2.5in x 1in space (times 6 for each arm of the flake). Add to that, that the smallest thing I can print is .4mm (the size of the hole that the melted plastic comes out of) and the ability to do detail work is limiting. You’d think .4mm would sound tiny, but not in these confines.
When you put things exactly where they are on the temple, they may be too tight for all of the above. So sometimes I have to increase the size beyond reality to make it print well. Or change the 4 of something to 3 so they can be bigger and fit.
Oh, and make all of the above look spiffy when repeated as six arms of a snowflake. So a proper amount of open and closed areas. Take care for the joint where each arm comes together that it looks good, etc.
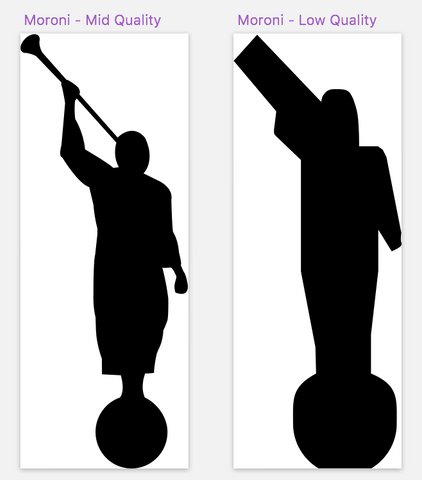
For example, Moroni should really look like the version on the left (below). But after much trial and error, to get him to print even semi-legibly at these small sizes he actually needs to look like the version on the right to not be as breakable, and to actually print.

I then have to print out a version of the temple, see what worked and what didn’t, then go back to the main file and tweak. Move things apart, make things bigger than they usually are, but also not too big as you need separation.
Printing
Each small flake takes 10-15 mins to print. Not long in the grand scheme of life, but before printing a new one, you have to remove the first one. That requires someone to be there while they actually have a life elsewhere. So I am able to arrange to print 3 at once on the space that I have. This is better, as it now takes 40-50 mins to print them (moving between them adds time), but still needs someone to remove them every hour or so.Printing isn’t an exact science. Sometimes you will have strings of plastic that cause problems, some prints will just mess up for unknown reasons, etc. There is still a lot of manual aspects to the printing process that makes it so we can’t just make them 24/7.
Invalid password
Enter
